Stuffing Things
Over at Craftster I entered my first contest. I created a pillow out of old jeans. The pillow isn't exactly my style, but it was a creative exercise. I'm hoping the cats will like it, but so far they haven't showed much interest.


I'm thinking of adding some pillows, of a very different design, to the stock in my shop. My In the Home section needs some more variety anyway. I'm also thinking about some cute magnets for that section as well. But they will ave to wait until after the holiday season.
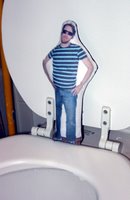
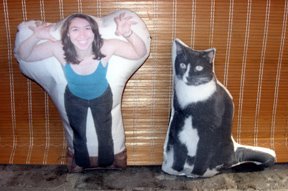
Another project I worked on awhile that isn't going to show up in my shop anytime soon are my photo dolls. I submitted this as a project to Venus Magazine's Craft Off but never heard anything. They really are a goofy, inexpensive, personalized gift. Here are some of mine.
I even have directions!
Supplies:
• Thin fabric (can be white or light colored)-under $3.50 a yard
• Freezer paper-under $4.00
• Interfacing (optional)-under $4.00 a yard
• Stuffing-a big bag can cost about $2.00
• Needle and thread-under $3.00 for needle and thread
* Note: all these supplies will make more than one doll, a yard of fabric will yield 4-6 dolls easily, depending on their size. So the total for each doll is far below $25!

Hopefully you have around or can use a friend’s for FREE:
• Computer
• Scanner OR digital camera
• Printer (color or black ink)
• Iron
• Sewing machine (optional)
• Scissors
• Pins
Instructions:
First you’ll need to take a picture. Take a picture of whatever you want to make into a doll, your friend, a pet, etc. Get the photo on your computer by either scanning it or using a digital camera. Arrange the image the way you want it. You may need to resize it. Make sure it is small enough to fit on a 8 ½ x 11 piece of paper.
Before printing you need to prep your fabric. Take a piece of fabric a little bigger than a normal 8 ½ x 11-inch piece of paper. Warm up your iron. Make sure it’s nice and flat and smooth. Take an equal size of freezer paper. Iron the shinny side of the freezer paper to the fabric. This gives it some heft to help get it through the printer. Now carefully cut the fabric and freezer paper down to an 8 ½ x 11-inch size so it can easily feed through your printer.
It’s printing time. Put your fabric in the printer and choose to print in color or black ink.
Once you have printed the fabric. Carefully peel away the freezer paper. Cut out the shape of the doll on the fabric, leaving an inch around for the seam allowance. Cut out another piece of plain fabric for the backing of the doll. Place the plain fabric over and covering the doll image so it is inside out. Pin it together. If you have a sewing machine sew it together leaving about a two-inch space for stuffing. Otherwise you’ll have to hand sew, leaving the same space open. Flip your doll right side out and stuff. Fold the seams under and hand stitch or machine sew the opening closed. You can embellish the doll if you want with clothes, sequins, buttons, yarn, etc.
The possibilities are endless with these dolls… make a mini-me for a friend, trade with your boyfriend or girlfriend, make a voodoo doll, or pet toy.


I'm thinking of adding some pillows, of a very different design, to the stock in my shop. My In the Home section needs some more variety anyway. I'm also thinking about some cute magnets for that section as well. But they will ave to wait until after the holiday season.
Another project I worked on awhile that isn't going to show up in my shop anytime soon are my photo dolls. I submitted this as a project to Venus Magazine's Craft Off but never heard anything. They really are a goofy, inexpensive, personalized gift. Here are some of mine.

I even have directions!
Supplies:
• Thin fabric (can be white or light colored)-under $3.50 a yard
• Freezer paper-under $4.00
• Interfacing (optional)-under $4.00 a yard
• Stuffing-a big bag can cost about $2.00
• Needle and thread-under $3.00 for needle and thread
* Note: all these supplies will make more than one doll, a yard of fabric will yield 4-6 dolls easily, depending on their size. So the total for each doll is far below $25!
Hopefully you have around or can use a friend’s for FREE:
• Computer
• Scanner OR digital camera
• Printer (color or black ink)
• Iron
• Sewing machine (optional)
• Scissors
• Pins
Instructions:
First you’ll need to take a picture. Take a picture of whatever you want to make into a doll, your friend, a pet, etc. Get the photo on your computer by either scanning it or using a digital camera. Arrange the image the way you want it. You may need to resize it. Make sure it is small enough to fit on a 8 ½ x 11 piece of paper.
Before printing you need to prep your fabric. Take a piece of fabric a little bigger than a normal 8 ½ x 11-inch piece of paper. Warm up your iron. Make sure it’s nice and flat and smooth. Take an equal size of freezer paper. Iron the shinny side of the freezer paper to the fabric. This gives it some heft to help get it through the printer. Now carefully cut the fabric and freezer paper down to an 8 ½ x 11-inch size so it can easily feed through your printer.
It’s printing time. Put your fabric in the printer and choose to print in color or black ink.
Once you have printed the fabric. Carefully peel away the freezer paper. Cut out the shape of the doll on the fabric, leaving an inch around for the seam allowance. Cut out another piece of plain fabric for the backing of the doll. Place the plain fabric over and covering the doll image so it is inside out. Pin it together. If you have a sewing machine sew it together leaving about a two-inch space for stuffing. Otherwise you’ll have to hand sew, leaving the same space open. Flip your doll right side out and stuff. Fold the seams under and hand stitch or machine sew the opening closed. You can embellish the doll if you want with clothes, sequins, buttons, yarn, etc.
The possibilities are endless with these dolls… make a mini-me for a friend, trade with your boyfriend or girlfriend, make a voodoo doll, or pet toy.
posted by Rebecca at 5:09 PM
![]()
![]()


0 Comments:
Post a Comment
<< Home